cyberPOST connects to your debtors ledger through industry standard database drivers to compile debtor statements in stylish HTML documents and directly emails or faxes them out in one process. It first emails all those clients who have an email address in your debtors ledger. It can then fax all those who do not have an email address but who have a fax number. Lastly it can print out statements for those clients who have neither an email address nor a fax number. In this day and age this is very rare so with cyberPOST you will practically eliminate all cost related to the monthly printing and mailing of your debtor statements.
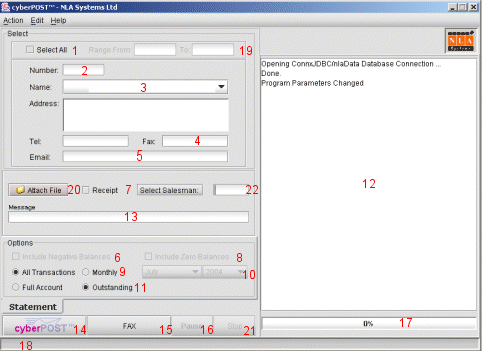
Account Selection
Debtor accounts can be selected by account number or by account name. If you want to email one statement for a particular account, you can either type in its account number in Account Number field (2) and press <enter> or else, you can pick the required account name from the Account Name combo box (3). Accounts that have neither an email address nor a fax number do not show in the combo box. To select all accounts, just check ‘Select All Accounts’ checkbox (1).
Options
When you select all accounts, the 'Include Negative Balances' check box (6) is used to indicate whether you want to include accounts having a negative balance.
Also when you select all accounts, the 'Include Zero Balances' check box (8) is used to indicate whether you want to include accounts having a zero balance.
The 'Return Receipt' check box (7) specifies whether the email recipient is prompted to acknowledge receipt of document. You will be notified by return email when he or she does so.
You can also choose whether you want to show all transactions in each account or whether you want to just show those transactions for a particular month. By checking 'Monthly' radio button (9), you enable the month and year combo boxes (10). There you can select your intended month and year. By default, current month and year is selected.
Whether you just want to show outstanding transactions or want to send a full account is specified by checking one of 'Full Account' and 'Outstanding' radio buttons (11). Default is 'Outstanding'.
The described options work in combination and by default specify all accounts except those with a zero or negative balance, showing all outstanding transactions.
Any text that you have entered in the 'Statement Message' field (13) will appear as a message to your clients at the bottom of each statement.
Activity Log Window & Progress Bar
The large scroll pane on the right (12) displays system activity as well as any error messages. It also enables you to not only see the current message but also to scroll through the whole array of messages generated since cyberPOST was launched. This text is not lost when you exit cyberPOST, but is saved in a log file for eventual viewing.
The progress bar (17) shows what percentage of the cyberPOST process has been completed.
Activity Log File
The system activity log described above is simultaneously written to a file and each item written is time stamped. This file is located in the cyberPOST folder. This can be viewed at any time by clicking 'Action' ---> 'View Activity Log'. A separate file for every year is kept. You can view the log file for the current year only. To view the log file for previous years, you can do this manually using your favorite text editor or browser.
Emailing Statements
Click the cyberPOST button (14) to email out statements according to what you have defined in 'Options' described above. If for example you have checked the 'Select All Accounts' checkbox and left unchecked 'Include Negative Balances' and 'Include Zero Balances' checkboxes, cyberPOST starts to email all statements while skipping those accounts with a zero or negative balance. Any text that you have entered in the 'Statement Message' field will appear as a message to your clients at the bottom of each statement. Any time while statements are being emailed, you can pause the process and resume it by toggling the 'Pause/Resume' button (16). Alternatively, you can access this function through the menu bar by clicking 'Action' -----> 'cyberPOST' or else, directly by pressing Control-C.
Faxing Statements
Click the FAX button (15) to fax out statements of accounts which do not have an email address but do have a fax number. The fax process uses what you have defined in 'Options' panel in a manner identical to the email process described above. Alternatively, you can access this function through the menu bar by clicking 'Action' -----> 'Fax' or else, directly by pressing Control-F.
Preview
When you customize the appearance of your statement as described below in 'Preferences', you may see the result in Preview. You can find this function under 'Action' in the menu bar. You can also go directly to it by pressing Control-V. A 'Preview' button is also available while setting preferences.
Printing
Those accounts which do not have an email address or a fax number can have their statement printed to your browser. You do this by first checking 'Select All Accounts' checkbox and then clicking 'Action' ----> 'Print To Browser' in the menu bar. You can also call this function directly by pressing Control-P. The browser is automatically launched and will contain these statements. There is a page break between each statement. From the browser, you can print to any windows printer on your computer or network. One important thing to remember before doing so is to remove all header, footer, and margin settings. This is done by going to File --> Page Setup.
Connect To Database
When cyberPOST is launched, it automatically attempts to connect to the database that has been defined in 'Preferences'. If for some reason or other, this database was not available when the application was launched, the 'Connect To Database' function enables you to do so once the database is available again. This function is found under 'Action' menu bar item or can be invoked directly by pressing Control-D.
The 'Preferences' function is found under the 'Edit' menu bar item and enables you to customize the statement document to your taste and to assign user-defined settings. These settings are divided into six tabs, namely Details, Logo, Colors, Database, Mail Server and Fax. At any point during this procedure, you can see how the final document will appear by pressing the 'Preview' button.
Details
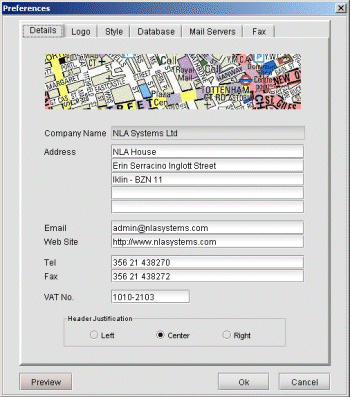
Here
you can enter your company's address, telephone, fax and VAT numbers.
You can also enter your email address and a URL to your web-site. All
these details will show on each statement header. The recipient of
your statement can click on the URL to jump directly to your website
and by clicking on the email address his mail program opens up with
your email address, ready to reply to you in case he or she wants to clarify something in the
document. Through
the 'Statement Header
Justification' radio button group you can position this header to be
centered, left or right justified. Default is center.
Logo
![]()
You can have your logo at the top of each statement document. This can be done by providing a link to your logo file on the Internet in the field provided. Through the 'Logo Justification' radio button group you can position your logo to be centered, left or right justified.
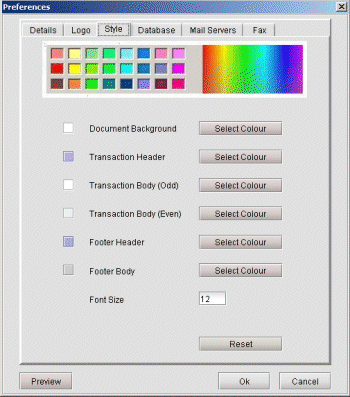
Colors
cyberPOST has been designed for maximum flexibility and can connect to any accounting system that supports any kind of open standard such as ODBC and JDBC. The fields in the Database tab enable you to define a connection to your accounting system database.
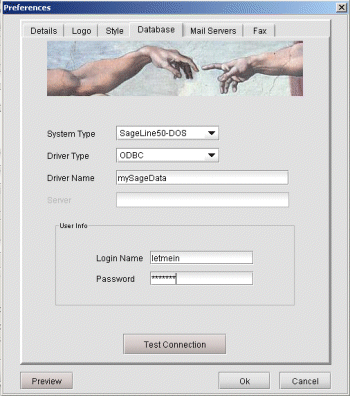
After you have entered your database details described in the table, you can test your newly defined database connection by clicking the 'Test Connection' button.
| System type |
Choose system type from one of the list of supported accounting systems. Presently, cyberPOST is ready for NLA Systems's BIS accounting system and Sage. More systems will be added in the very near future. Email us if you wish your accounting system to be added to the list.
|
|
Driver type
|
This combo box allows you to specify which driver to use to connect to your system. The Sage package includes an ODBC driver and we have used this to test connections to it. On how to create an ODBC driver for Sage click here>>
|
|
Driver name
|
This is the name we assigned to the driver that we have created. In our example in the ODBC tutorial, we gave it the name mySageData. |
|
Server
|
For
drivers that can act as servers, this is where you enter
their host name or IP address. |
|
Login name & password |
For security reasons, certain database drivers require a login name and password to log into their database. Enter your database login name and password here to enable cyberPOST to gain access to it.
|
Mail Server

cyberPOST connects to your mail server to independently send out your statements using SMTP (Simple Mail Transfer Protocol). Here you can select your service provider from the pull down menu list and the SMTP server will be filled in automatically. If your provider is not in the list, select 'Other' and type it in.
If you do not know the name of your SMTP server you can enquire it from your Internet Service Provider (ISP). It is usually your ISP's URL with a leading 'mail.'
Your company may have its own mail server. If you do
not know it you can get it from your system administrator. It is usually your
web site's URL with a leading 'mail.'. For example, our URL is
nlasystems.com and our web server is mail.nlasystems.com.
Fax
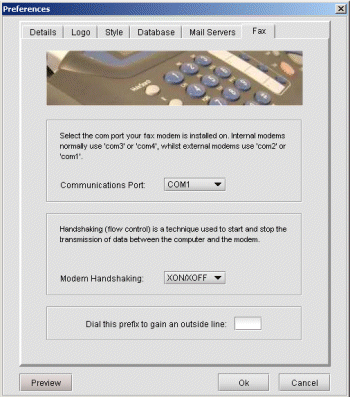
The fax process needs to find a fax modem installed on your computer. This is where you specify its COM port number. To find this out from your Windows go to Start --> Settings ---> Control Panel and then choose the 'Phone and Modem Options' icon. Internal modems are commonly configured as COM3 or COM4 while external modems are very often installed as COM1 or COM2.
Handshaking (flow control) is a technique used to start and stop the transmission of data between the computer and the modem. By default, RTS/CTS handshaking is set. If you experience problems with your modem, please switch to XON/XOFF.
If your fax modem is connected to a PABX and you need to dial a prefix to get an outside line, enter this prefix in the field provided and make sure you add a comma as a suffix. This signals your modem to pause for a second or so.