Windows 98 / 2000 / NT / ME
From the Start button go to Settings >
Control Panel
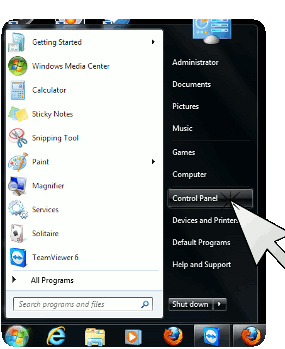
Windows XP / Vista / Windows 7
From the Start button go to Control Panel
Creating an ODBC driver for Sage
Step 1.
|
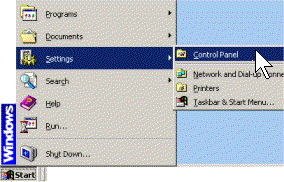
Windows 98 / 2000 / NT / ME
From the Start button go to Settings > Control Panel
|
Windows XP / Vista / Windows 7 From the Start button go to Control Panel
|
___________________________________________________
Step 2.
|
Windows 98 / ME Click on ODBC Data Sources (32bit)
|
Windows 2000 / NT Click on Administrative Tools
Click on Data Sources
|
Windows XP / Vista Click on Performance and Maintenance
Click on Administrative Tools
Click on Data Sources
|
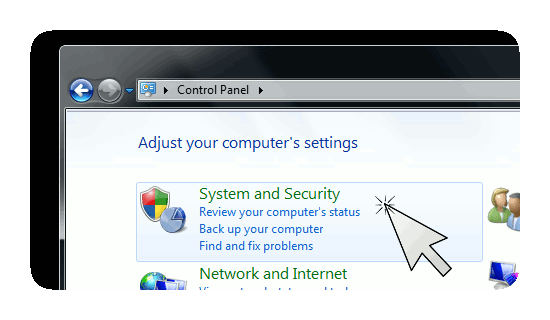
Windows 7 Click on System and Security
Click on Administrative Tools
Click on Data Sources
|
___________________________________________________
Step 3.
Flip to System DSN tab and then click the Add button

___________________________________________________
Step 4.
Scroll down until you see Sage driver. Highlight it and click the Finish button

|
Note:
Some versions of Sage (the newer ones) install this driver automatically. If you do not see a Sage driver in the list shown in the figure above, it means that it has not been installed yet. You can easily install it yourself by browsing through the Sage installation disk and running setup found in a folder ODBC32. |
___________________________________________________
In Data Source Name field, type in a name for your ODBC driver (mySageData in figure below). Take a note of this name because you need to specify it in cyberPOST when defining your database connection.
In Data Path field, enter the path to the folder which contains your Sage data files.

Note:
If you have more than one company in your Sage package, you need to define an ODBC driver for every one that needs to be connected to cyberPOST2. You also need to have a separate cyberPOST2 license for each one of these companies.